Introduction
A key component of a computer system is hardware. A computer case is a hardware component of a computer system.
A computer case is an enclosure that houses various components of a computer.
We will learn the importance of a computer case. We will also learn how to assemble and disassemble it.
Activity 1: Learning Computer Science vocabulary
- Computer case
- Tower case
- Desktop case
- Disassembling
- Assembling
Use available resources such as the Internet or Computer Science textbooks to find out the meaning of each term.
Write down each meaning in your own words.
On the right, there is an example of a journal entry that was made by Amina, who is a Grade 8 learner.
She also wrote down short notes to record her findings.
Computer Science Vocabulary
- The meaning of Computer Case: An enclosure that houses the components of a computer. A computer case is also known as a computer box. Computer cases are of various types.
- Desktop case
- Tower case
- All-in-one case
Explaining the meaning of a computer case
Activity 2: Group work
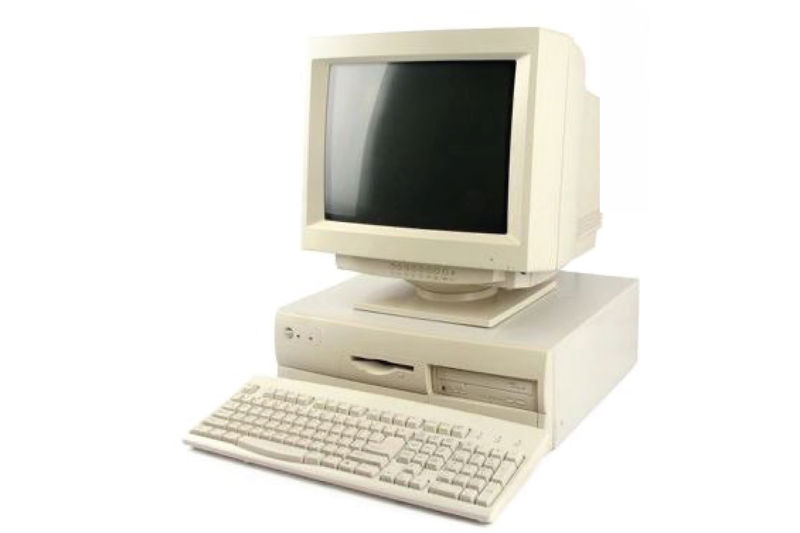
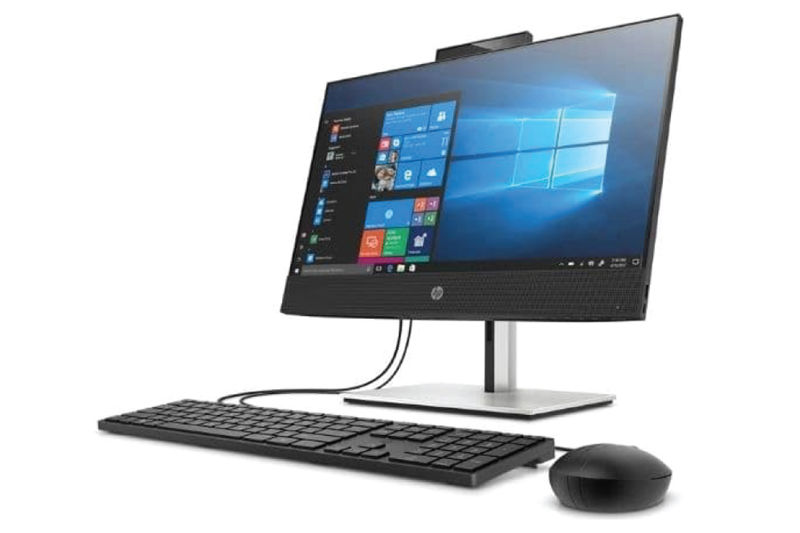
In groups, discuss the pictures labelled 1 and 2 in Figure 1.1(a).
Search for information from available resources such as the Internet and Computer Science reference books.
Write down the key points in your notebook. Present your observations to the class for further discussion. Answer the following questions:
- What is a computer case?
- What are the various types of computer cases?
- What other terms are used to refer to the computer case?

- Side wiew

- back view
Key Learning Points
Defining a computer case
A computer case is the enclosure that houses the components of a computer.
Other terms that are used to refer to the computer case include the following: a tower, a box, a system unit, a base unit, an enclosure, the computer housing, a chassis and a cabinet.
Safety Tip
Computer cases that are made of metal could have sharp edges.
Be careful when handling an open computer case to prevent causing serious cuts and injuries to yourself or others.
Activity 3: Group work
In groups study the pictures shown in Figure 1.1(b). Describe the computer cases labelled 1, 2 and 3. Write summarised points in your notebook. Share your key points with the group members.
- 1

- 2
- 3
Fig. 1.1(b): Different types of computer case.
Key Learning Points
Types of computer cases
- There are various types of computer cases as shown in Figure 1.1(b).
- A desktop case is flat and box-shaped. A desktop computer case is designed to be placed on top of a desk, with the monitor placed on its top. This arrangement helps to save space.
- A tower case is built to stand tall. It is commonly placed on the desk or on the floor.
- In modern computers, the monitor and the system unit are designed as a single component.
Activity 4: A group visit
- Visit a computer user environment in your school or in your community.
Under the guidance of your teacher or a computer resource person, observe different computer cases. - What type of computer cases are available in the computer user environment? Record your observations in your notebook.
- Discuss your findings with other learners.
Outlining the procedure for disassembling and assembling a computer case
Activity 5: Video Lesson: A class activity
Watch the video lesson:
Note down the steps outlined in the video lesson for disassembling and assembling a computer case in your notebook. In groups, discuss the labelled picture of a computer case shown in Figure 1.1(c).
Safety Tip
- Cyberwellness refers to the positive well-being of Internet users. It involves raising the awareness of how to protect oneself in cyberspace. The focus is to assist learners to become responsible users of web content.
- As you watch video lessons on the Internet, ensure your safety. Do not visit websites with harmful content.
- Do not spend extended periods on the Internet.
- To protect your eyes, take frequent breaks.
- To protect your back, sit in an upright posture
Key Learning Points
The steps for disassembling a computer case
The following are the steps to follow when disassembling a computer case.
Ensure you have the correct tools such as a screwdriver and a clean working space to place the computer and the disassembled components.
Step 1: Shut down the computer correctly.
Step 2: Switch off the power supply at the socket and unplug the connecting cable.
Step 3: Move the computer to a clean working space. You could spread a tablecloth on a clean floor and use that space to keep together small parts such as screws that are likely to roll around during the activity.
Step 4: Detach the computer cables from the computer case. Discharge any static electricity by touching an earthed metallic object.
Step 5: Unplug every cable from the computer, including the cables that connect the power supply at the socket, the keyboard, the mouse, the monitor, the printer and any other device connected to the ports.
Step 6: Remove the cover of the computer case. Unscrew it carefully with a screwdriver.
Step 7: Remove the Central Processing Unit (CPU), the CPU fan and the heat sink.
Step 8: Remove the power supply.
Step 9: Remove the Compact Disk (CD) drive and the Digital Versatile Disk (DVD) drive.
Step 10: Remove the hard drive.
Step 11: Remove the Random Access Memory (RAM) chips.
Step 12: Remove the motherboard.
Activity 6: Group work
Study the steps outlined in the Key Learning Points. In your notebook, rewrite the steps in your own words. Share your summarised steps with other learners.
Tips for caring for computer equipment
- When assembling and disassembling the computer case, be guided by your teacher or a computer resource person.
- Computer equipment is expensive. Handle all computer components with care.
Disassembling a computer case to expose the components
Activity 7: Guided group work
Visit a computer user environment. Request a computer resource person to guide you to perform the following tasks:
- Disassemble a computer case to expose the enclosed computer components.
- Disassemble a computer case.
- Identify the components housed in a computer case.
Discuss what you will observe.
Activity 8: Self-Assessment
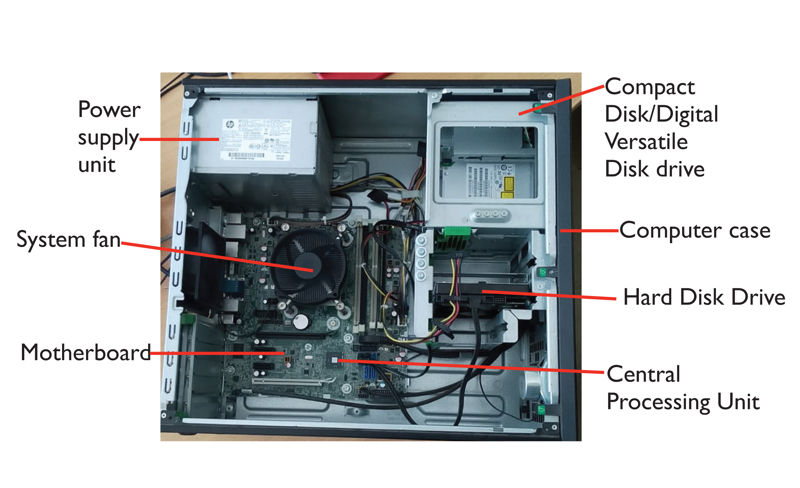
Grade 8 learners visited a computer repair shop neighbouring their school. A computer technician disassembled one of the computers for repair. Figure 1.1(d) shown below illustrates the components housed in the computer case that the learners observed. Identify the components labelled 1 to 9. Complete the task in your notebook and then watch the digital lesson that follows.
Video Lesson:
Key Learning Points
The computer case houses the components discussed below:
- The motherboard is a thin plate that is enclosed in the computer case.
- The motherboard connects directly or indirectly to every part of the computer.
- As we will learn later in Sub Strand 1.2, the following components are mounted on the motherboard: the CPU, the CPU socket, the heat sink, RAM modules, the system fan, the hard disk drive, connections to computer ports and expansion slots for video and audio cards.
- The Central Processing Unit (CPU) is also called the processor. It is located inside the computer case on the motherboard. It is sometimes called the brain of the computer.
- Whenever a key is pressed, the mouse is clicked or an application is launched, instructions are sent to the CPU.
- Random Access Memory (RAM) is the temporary storage location of data in a computer.
- The hard drive is a fixed storage device. When you save a file in a computer, data is written to the hard drive.
- The hard drive is where data files and software are stored. The hard drive is a long-term type of storage. This means that data is permanently saved even after the computer is shut down and the power is turned off.
- The power supply unit supplies the computer with electric power. It sends power through cables to the motherboard and other components.
- Computer cables are the pathways for the transmission of data, instructions and power between the components of a computer.
Activity 9: Group work
In groups, use available resources to find out other components housed in the computer case that are not included in the Key Learning Points. List them in your notebook.
Tips for caring for computer equipment
When disassembling and assembling the computer case, ensure that your hands are completely dry to avoid damaging any electrical parts as well as avoid electrocution.
Identifying the components housed in a computer case
Activity 10: Self-Assessment
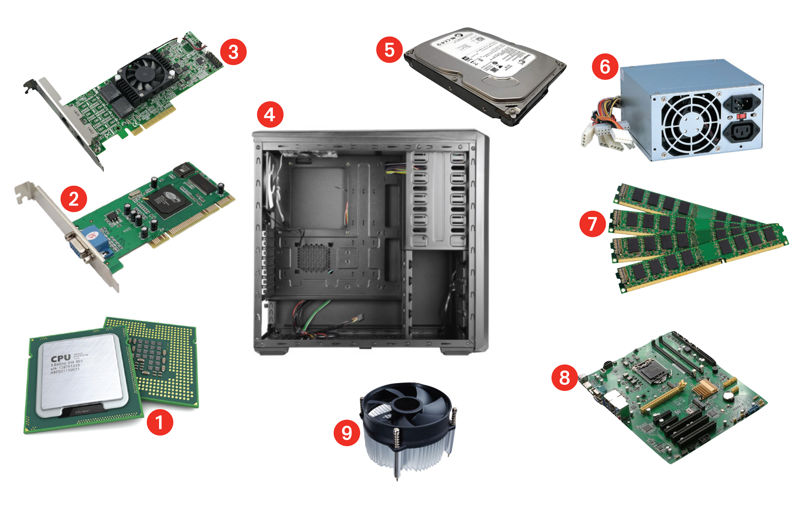
Identify the components shown in the pictures labelled 1 to 9 in Figure 1.1(e) shown below. Where are these components found in a computer? Complete the task in your notebook.

Fig. 1.1(e): Some components that are enclosed in a computer case.
Activity 11: Video Lesson: A class activity
Watch the video lesson:
Assembling a computer case to cover its components
Activity 12: Consulting a resource person
Consult a resource person to demonstrate how to assemble a computer case. Take turns to disassemble and assemble a computer. Observe safety measures.
Key Learning Points
The steps for assembling a computer case
The following are the steps to follow when assembling a computer case.
Ensure you have the correct tools such as a screwdriver and a clean working space to place the computer and the components.
Step 1: Fix the motherboard.
Step 2: Fix the Random Access Memory (RAM) modules.
Step 3: Fix the hard drive.
Step 4: Fix the Compact Disk (CD) drive and the Digital Versatile Disk (DVD) drive.
Step 5: Fix the power supply.
Step 6: Fix the Central Processing Unit (CPU), the CPU fan and the heat sink.
Step 7: Use a suitable screw driver to fix the cover of the computer case or slide it in place.
Step 8: Fix the cables that connect the power supply, the keyboard, the mouse, the monitor, the printer and any other device connected to the ports.
Step 9: Fix the cover of the case.
Step 10: Place the computer on an appropriate working space, for example, a desk.
Step 11: Plug it to the socket and switch it on to ensure that it is working.
Note that the steps to follow when assembling a computer case are in the reverse order of those for disassembling a computer case.
Safety Tip: A reminder
When disassembling or assembling a computer, take the following precautions:
- Shut down the computer.
- Disconnect all computer parts from the source of power.
- Ensure that the working space is clean and free of magnets. Magnets can affect the working of the various components of the computer.
Preparing a list of specifications of computer cases
Activity 13: Group work
Bidii Junior Secondary School is planning to buy computers for learners. The Computer Science teacher was tasked to prepare a list of specifications of computer cases. She drafted a few points and requested her learners to prepare a comprehensive list.
Her drafted list.
Specifications for a Computer Case: A Checklist
- Form Factor (specify the size and arrangement)
- Number of drive slots (for CD/DVD/Flash)
- Power supply (for sufficient capacity to power computer)
- Cooling (provision for a fan)
- Ease of assembly and maintenance
Work in groups. Refer to available resources such as the Internet, reference books and magazines to prepare a list of specifications of computer cases.
The following are important specifications to include in your list:
- Form factor: This refers to the size, type and physical arrangement of the computer case.
- The number of drive slots you plan to install such as the CD drive, the hard drive, the floppy drive and the DVD drive.
- Power supply: Confirm that the power supply in the computer case has sufficient capacity to power the computer.
- Cooling: Select a case that has a slot to mount the cooling mechanism. A fan is mounted to cool specific parts such as the CPU and the RAM modules.
- Ease of assembly and maintenance: Choose a computer case design that will be easy to open during maintenance of the computer.
- Appearance: This describes the colour, the style and the design of the case. Depending on the cost, the material could be made of plastic or metal.
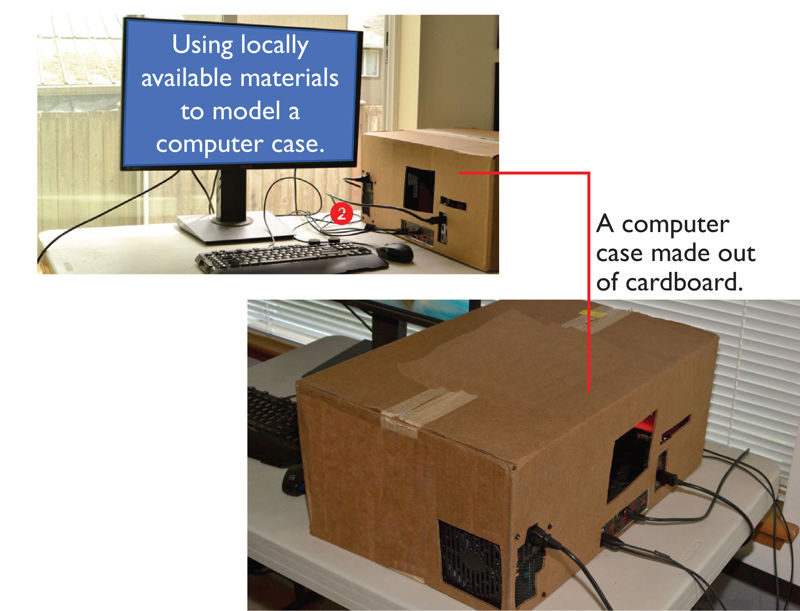
Activity 14: Group work: Modelling a computer case
Grade 8 learners in Amani Junior Secondary School used cardboard paper to create a computer case. Their model is shown in Figure 1. 1(h).
Work in groups. Use locally available materials to model a computer case. Record your activities in pictures and short videos.
Create a portfolio displaying pictures showing the modelling activity. Share the pictures and videos with other learners.
Extended Activity for Further Learning
Get involved in the school and home community
Assist computer maintenance personnel in your school or home community to disassemble and assemble computer cases during hardware maintenance or cleaning of computer equipment.
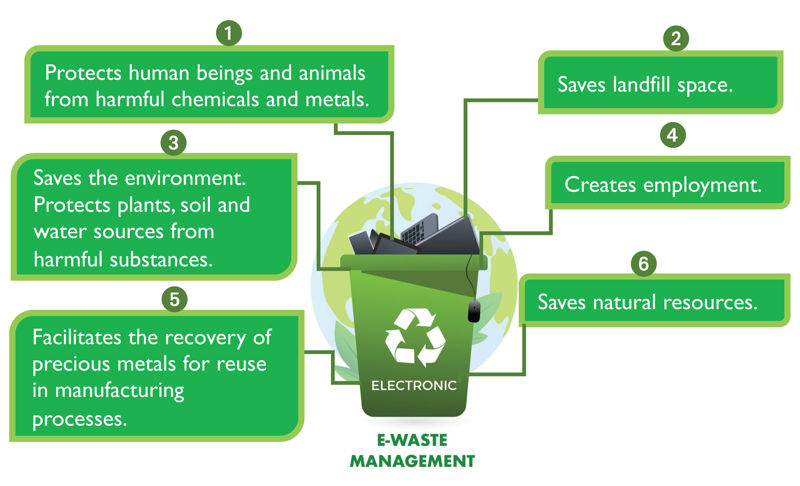
Recognising the importance of managing computer cases waste
Activity 15: Group work
What is the importance of managing computer cases waste?
In groups, discuss Figure 1.1(i). It graphically shows the importance of managing computer cases waste. Summarise the key points in your notebook. Share your findings in a class presentation.
Extended Activity for Further Learning
Advocate the importance of managing computer cases waste.
Write an essay that explains the importance of managing computer cases waste.
Submit the essay for publication in a school magazine or a daily newspaper.
The following are important points to include in your essay:
- Saves the environment and natural resources.
- Allows for recovery of precious metals such as aluminium, gold, steel and copper.
- Protects public health and water quality.
- Saves landfill space.
Activity 16: Start a Digital Waste Management Club
Recycling computer cases
Neema, her friends and other learners in her school and home community founded a Digital Waste Management Club.
They brainstormed on creative ways of reusing and recycling old and faulty computer cases that they collected from their home and school community. Figure 1.1(j) shows some of the items they created.
Work in groups. Think of creative ways of recycling old computer cases and computer case components. Share your ideas in a class presentation.
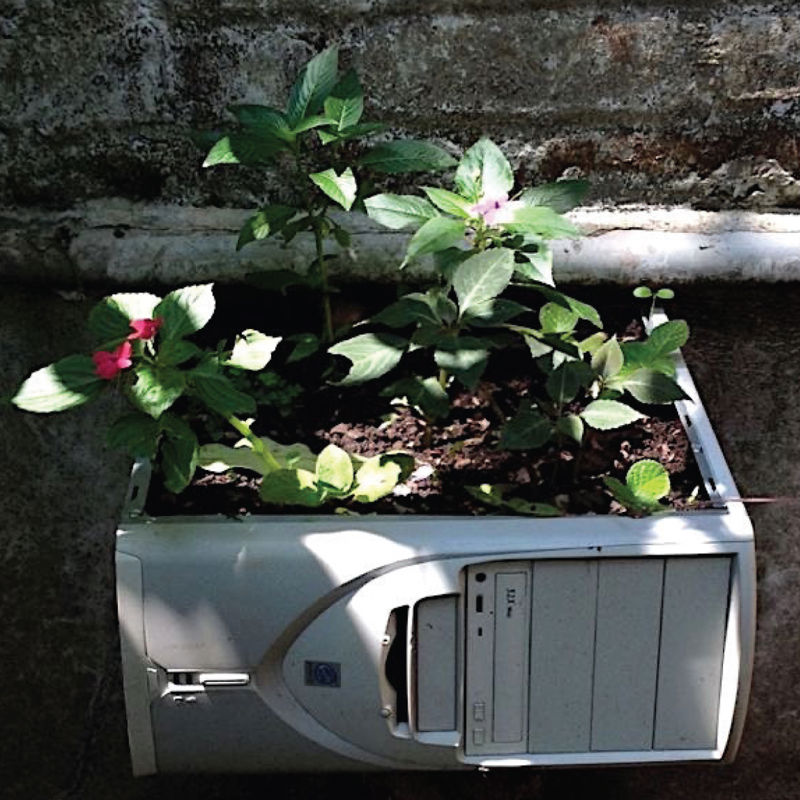
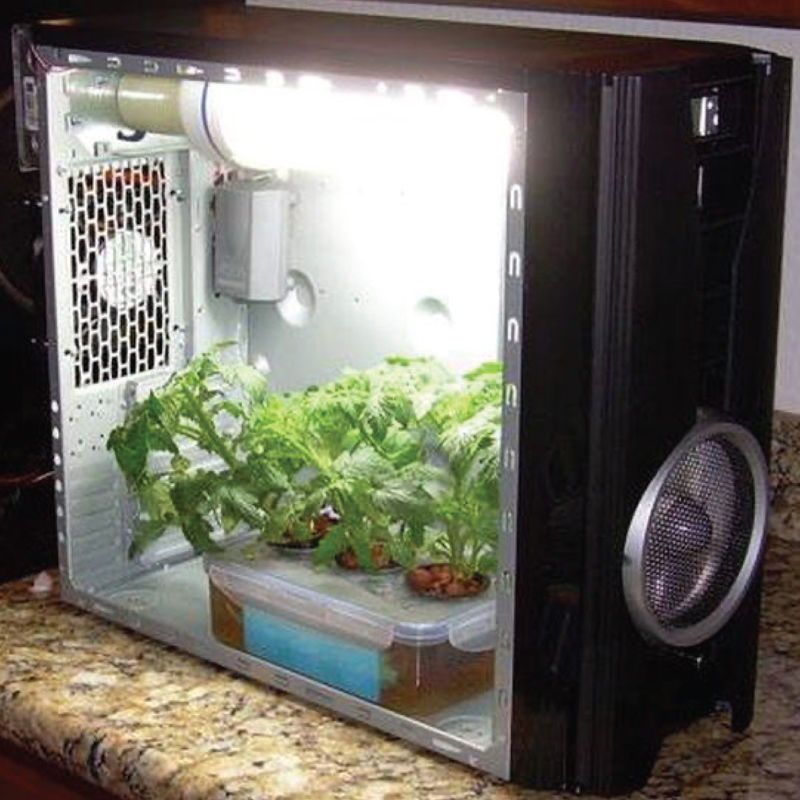
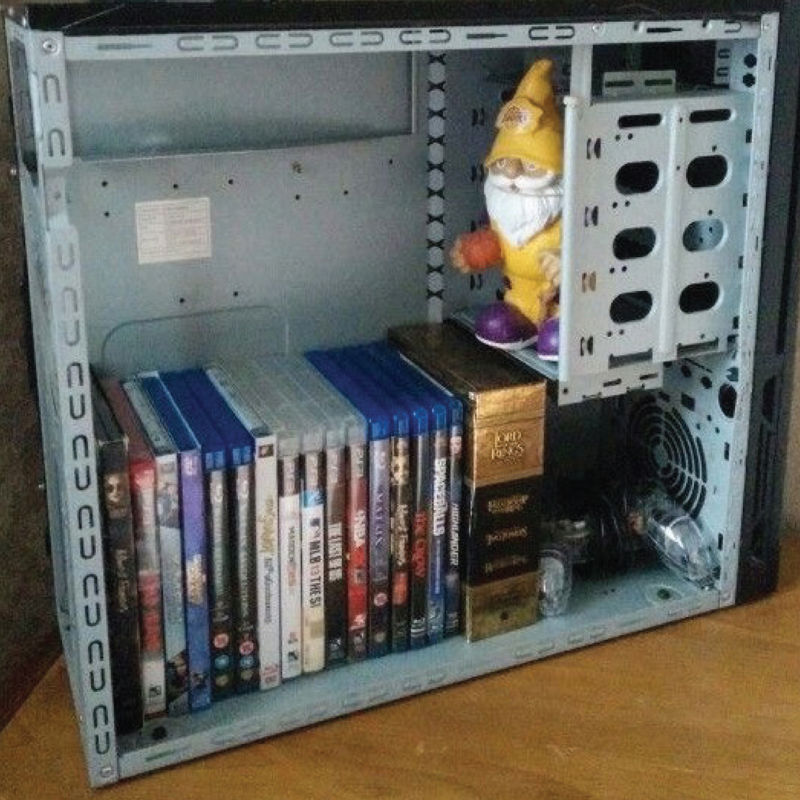
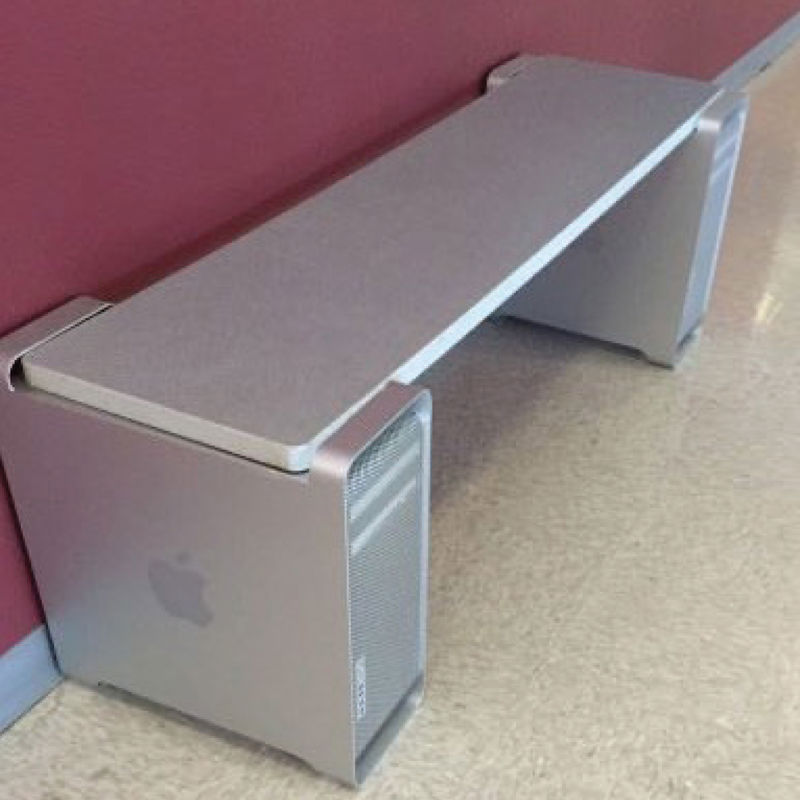
Fig. 1.1(j): Creative ideas for reusing old computer cases.
Tip: Environmental Care
Be an active citizen: Keep the environment free of digital waste. Participate in communal activities that involve computer cases waste management.
Review
Grade 8 learners visited a shop that sells various types of computer hardware.
They saw the item shown in the picture below. It was labelled ITEM 77. Use it to answer questions 1 to 6.
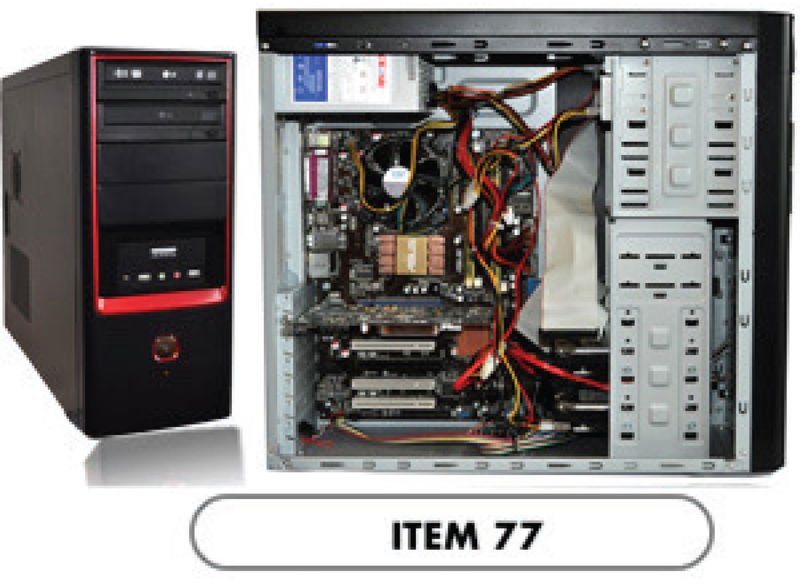
- What is the name of the item shown in the picture?
- What is its importance in a computer?
- Identify five components that are housed in ITEM 77.
- Briefly outline the procedure for disassembling and assembling the components enclosed in ITEM 77.
- List five items you would include in a list of specifications to be considered when acquiring the component.
- Suggest two creative ways of reusing or recycling old and faulty components that you have identified in Question 3 above.
Self-Assessment:
Tick the statement that accurately describes your ability to carry out the tasks numbered (a) to (e).
Tasks | Excellent. | Satisfactory. | I will revise. |
| |||
| |||
| |||
| |||
|
For further guidance, discuss the rating of your self-assessment with your teacher, parent or guardian.